Setting up budget alerts
Overview
Proactively manage AWS costs with budgets. Currently, CloudSpend supports multiple budget alert types:
Alerts based on actual spend: Set up recurring budgets that run monthly, quarterly, yearly, MTD, or YTD to notify your finance and engineering teams about cost overruns.
Before you create a budget, you need to create a budget policy. Budget policy defines what entity the budget applies to. Currently, you can associate a budget to an AWS account, tagged resource, or an already created business unit. For example, you've tagged a group of disparate resources powering your internal app with the tag: Application ID: portal and you want to set up a budget alert to track the spending for the app. In the create budget policy section, you can choose the AWS account where the AWS services powering the app resides, and choose the tag associated with the service to create a budget policy for your internal app.
Table of Contents
Configuring the budgets
Creating a budget
You can create one or more budgets in your subscription account.
- Go to the CloudSpend console.
- In the left navigation pane, choose Budgets, and then choose Configure Budget.
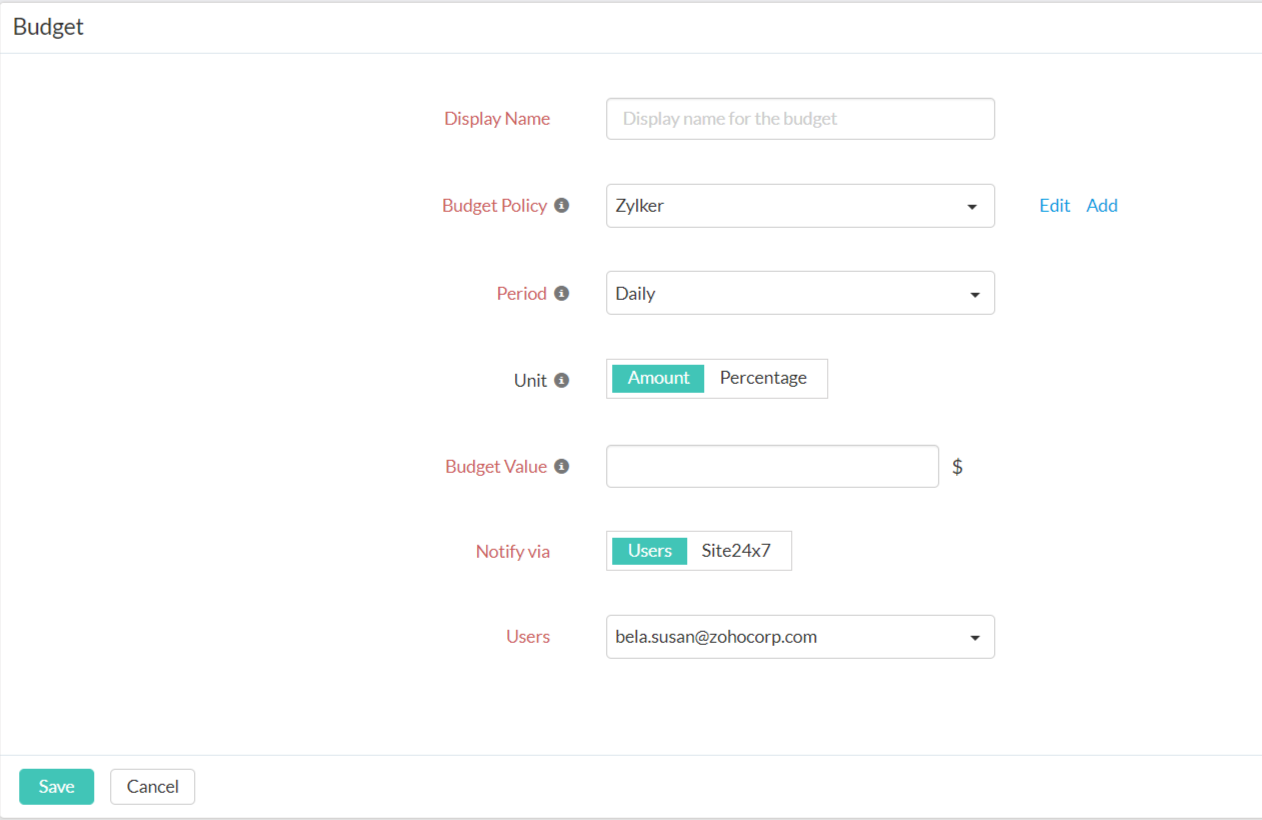
- Type the display name for the new budget.
- For Budget Policy, choose Add (If you're creating a budget for the first time since budget policies are reusable across multiple budgets.)
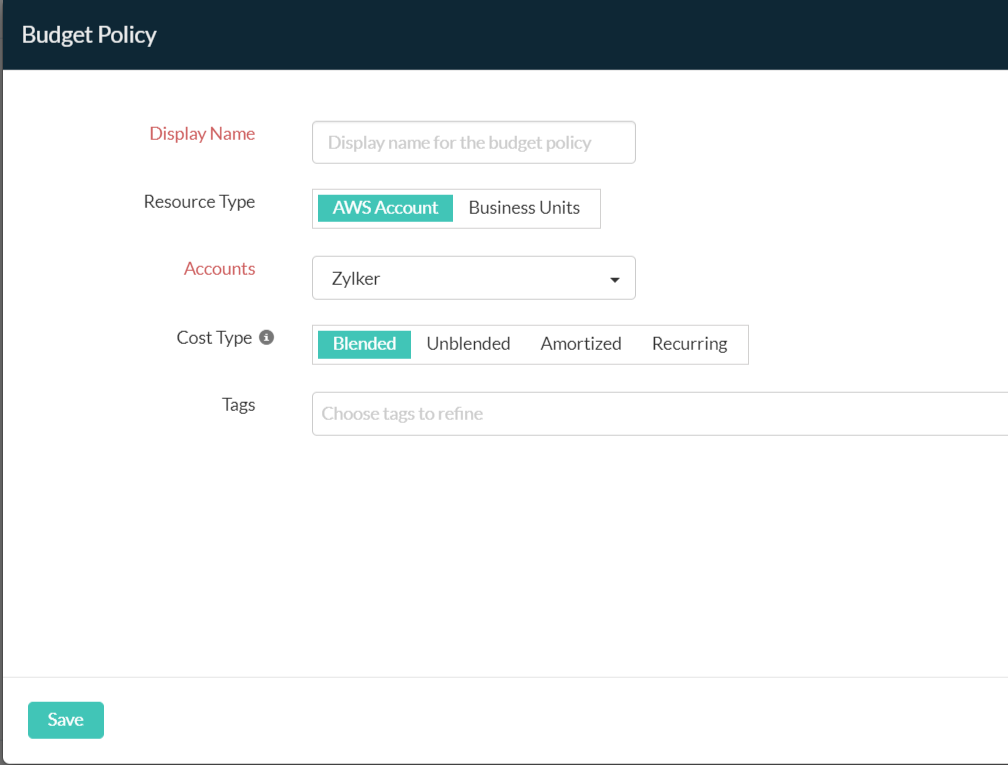
- In the Budget Policy dialog box, type a display name for the new budget policy.

- For Resource Type, you can either choose an AWS account or Business Units. Your choice determines the subsequent filters that get displayed in the dialog box.
- The Cost Type lets you select three different cost types for the budget policy: Blended, Amortized, or Recurring.
- Blended: This cost metric provides the average cost of usage across all billable accounts.
- Amortized: This cost metric provides the total billable cost upfront, and the monthly reservation fees that are spread across the billing period.
- Recurring: This cost metric provides the billable amount that keeps repeating.
- (Optional) If you choose an AWS account as your resource type, you can refine your selection further by selecting tag keys and values.
- Choose Save to create the Budget Policy.

- For Period, choose the duration for each budget.
- For Unit, choose the measurement in which budgets configured for your cloud cost are displayed. You can either choose Amount (in dollars) or Percent (with an option to select the rise or drop percentage).
- For Budget Value, you can enter the value of your cloud cost budget either in Amount or Percent, according to the Unit chosen. Your actual spend will be evaluated against this value once every day, and an alert will be triggered if actual spend exceeds the budget value.
Actual spend value is based on approximate charges accrued by your AWS account during the budget period. These values are subject to change until your AWS bills are finalized. The final billable amount may be higher than the charges that triggered the alert notification. - Choose the mode through which you'd like to get notified with the Notify via option. Choosing Users will help you receive the notifications related to your budgets in the email address associated with your account. Choosing Site24x7 will send you notifications through the User Alert Groups. If choosing to get notified via Site24x7, you can also choose the IT automation and third-party service of your choice as well.
- Automate incident remediation using IT Automation. The IT Automation Templates field is displayed only if you choose Site24x7 in the Notify via field. Select the applicable template.
- You can choose to receive notifications via third-party services of your choice. The Third-party Services field is displayed only if you choose Site24x7 in the Notify via field. Select the required third-party services.
- For Send Email to, choose contacts from the drop-down list. Budget alert notifications are triggered only once, and can only be sent to email contacts with the CloudSpend roles Administrator and User.
- Click Save.
The newly created budget will appear as a child monitor under the respective section in the CloudSpend tab in Site24x7.
View, edit or suspend a budget
To view, edit, or suspend a budget, follow the steps below:
- Go to the CloudSpend console.
- In the left navigation pane, choose Budget to view the configured budgets.
- Current Spend provides insight into the current spending of your cloud costs against a set budget. The current spending differs when the period is monthly and MTD. For the cost budget set monthly, the amount specified here is the cost accrued in the current month. For a budget set for an MTD period, the current spend amount will be the cost accrued from the beginning of the current month until the current date.
- Variance provides the difference in the cost entity between the budget allotted and the current spending. According to the unit chosen, the value will either be in Amount or Percent.
- Click Edit, and modify the fields that you want to change.
- Click Suspend to deactivate any budgets configured.
- Click Save.

Budget Details
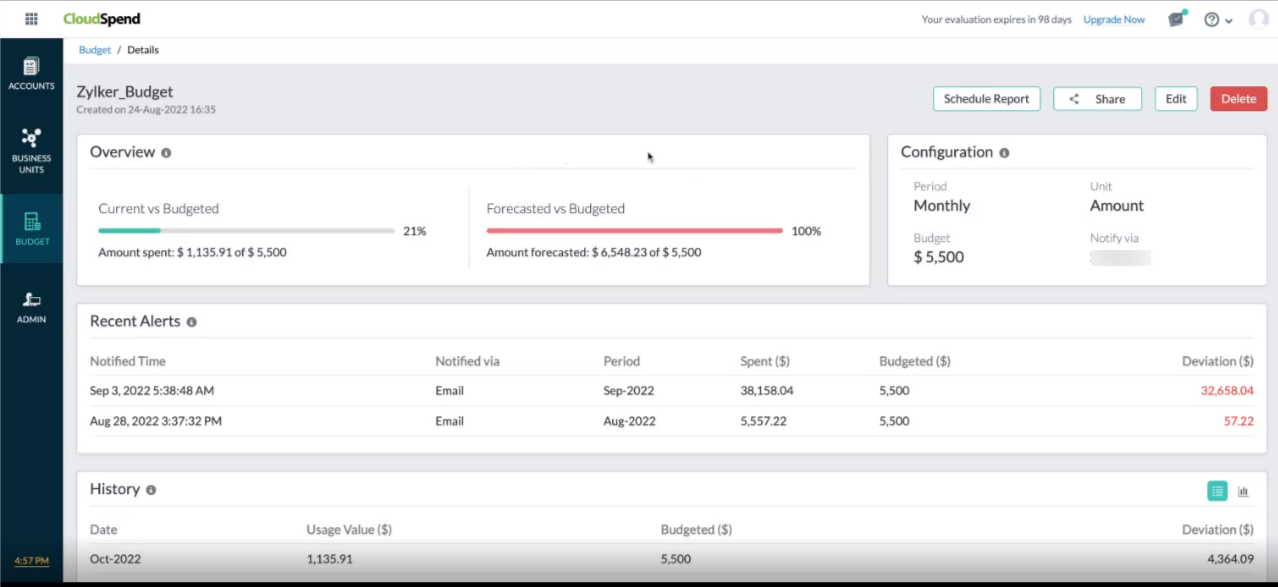
Obtain all information related to your budgets. You can view the budget details by clicking on the new tab icon next to your budgets.
- Get a comparison of the Current and Budgeted amounts as well as of the Forecasted and Budgeted amounts using Overview.
- Configure settings related to the budget and view them with Configuration. You can view the Period, Unit, Budget, and Notify via.
- You can also share the budget details as a PDF or as an email using the Share button.
- You can edit or delete the details using the Edit/Delete button.

Schedule Report
You can schedule four reports from the budget details section for:
- The budget dashboard which includes the list of all budgets.
- The budget details page of individual budget entries.
- The recent alerts raised for your budgets.
- The History section which will provide a detailed overview of the expenses and the deviations from the budgeted amounts.
Recent Alerts
View all the alerts that were raised for a particular budget with Recent Alerts and plan your expenses accordingly. You can view the time of notification, the medium through which the notification was sent, the period, amount spent, the budgeted amount as well as the deviation from the budgeted amount. When there are more than five alerts, you can view all the alerts since the time you've created the budget by clicking the View more link.
History
Get monthly, quarterly, or yearly historical data related to your budget based on the configured period type using History. This can help you in getting an idea of the amount spent during that period (Usage Value), budgeted value, and deviation from the budgeted amount. Historical data can help you in understanding the pattern of spending and the fluctuations from the budgeted amount, which can help you in planning your expenses for the upcoming months.
Budget Period
A budget Period helps you to choose the duration for each budget configured in your account. You can also choose to get notified in case of any variation from the budgeted amount. The various period options available are:
- Monthly*: Set a budget at the beginning of every month. For instance, if you wish to set a budget for the whole month of November, you can choose this option.
- Quarterly*: The budget will be set at the beginning of every quarter. This option can be helpful if you wish to analyze your budgets on a quarterly basis.
- Yearly*: Set the budget at the beginning of every year. This can be used if you wish to plan for the whole year at the very beginning of a year.
- MTD: Comparing the expenditure can help you to understand the spending pattern and the variations. With current month to date (MTD) as the period type, a comparison budget can be created. Using this option you can compare the cost from the beginning of a month to a specific date in the current month with the cost accrued in the previous month for the same duration (e.g. August 1-12 to September 1-12).
While choosing MTD, you can set the budget value in Percentage or Amount, with options to choose to view the rise or drop percent, thereby helping you to obtain a detailed analysis. - YTD: With year to date as the period type, a comparison budget will be created. Using this option you can compare the cost from the beginning of a year to a specific date in the year with the cost accrued in the previous year for the same duration. For instance, a YTD comparison budget can be created for the cost accrued during January to September 2019 and for the cost accrued for the period between January to September 2020.
When the period type chosen is YTD, you can set the budget value in percentage or as amount, with options to view the rise or drop in value. - Daily: By setting the period type as Daily, you can set a budget on a daily basis. This can help you check the expenses incurred on a day-to-day basis.
- Forecast (Month): With Forecast (Month), you can set the budget in line with the forecast for the current month. This can help you in ensuring that the budget isn't exceeding or dropping below the forecasted amount for the month, thereby helping you to manage the expenses in an organized way.
*Regardless of the date of budget creation.