Business Units
Business Units (BUs) allow grouping of one or more accounts and organizing them in a management hierarchy. Tracking cloud costs across various cost centers using inefficient tools or minimal cost tracking mechanisms tends to delay business decisions between teams. When an organization manages multiple cloud accounts, tracking cloud costs can be a lot of work. BUs help you view and analyze the shared IT expense across business cost centers.
You can create a BU for:
- Functional levels, like sales, consulting, product development, and more.
- Each combination of countries in which you operate and the functions in each country.
- Your customers, as an MSP.

Fig. 1: Business units list view
Contents
Use Cases
- Consider a scenario where you consume multiple AWS services in three different linked accounts—Test, Dev, and Prod—to build and ship a new application for a customer. You can also have a standard tag naming scheme (for example, naming projects by letter: Project X) for all the resources involved. Now, you can track the costs involved in the development of the app by creating a BU filtered with the common user-defined tag (Project X) and linked accounts.
- For geographically distributed sales teams, to view costs accrued only for those teams present in the USA, you can select the teams located in the USA, and group them as a BU.
- For a second project within your engineering team (we'll call this one Project Y), you can select specific accounts—say the accounts of the research and development team—within your engineering team to track costs using a BU.
Why Business Units?
The benefits of leveraging a BU include:
- Tracking governance and compliance according to company standards.
- Facilitating faster business decisions between finance and tech teams.
- Allocating shared cloud vendor support charges between teams.
- Improving managerial reporting and analytics with accessibility to global data.
- Obtaining the right balance of centralized and decentralized functions, improving decision-making.
Learn more about utilizing BUs using CloudSpend by understanding cost analytics (spend analysis and resource explorer), budgeting, and cost reporting in the following sections.
Cost Analytics
Spend Analysis
Spend Analysis provides you with information on cost split-up by service, account, region, component, trend, resource, and instance type. When you select a specific BU from the dashboard as shown in Fig. 1, you'll be taken to the spend analysis section of your BU where details of total cost accrued, maximum spending account, and minimum spending account are provided. You can also set a custom duration and pick different cost types like Blended, Unblended, Amortized, or Recurring from the drop-down. Learn more about scheduling your cost and usage reports for spend analysis of a BU.

Fig. 2: BU Spend Analysis
Resource Explorer
The BU Resource Explorer provides you with an aggregated view of your AWS resources in various categories like Accounts, Region, Service, or Tags for each BU. When you select View Details in the Accounts Splitup view of a specific BU as shown in Fig. 2, you'll be taken to the resource explorer section. The granular details of your resource level spending can be viewed on a daily, monthly, quarterly, or yearly basis, and can be exported as a PDF or emailed immediately. You can also set a custom duration and pick different cost types like Blended, Unblended, Amortized, or Recurring from the drop-down. Learn more about scheduling your cost and usage reports for Resource Explorer.

Fig. 3: BU Resource Explorer
Budgeting
You can create budgets for each BU to manage your costs proactively. Each budget configured for a BU will run monthly, quarterly, yearly, month to date, or year to date to notify you of any cost overruns. When you create a budget policy to associate with a budget, you can assign it to an existing BU. In this way, each team can track and manage its cloud costs within a budget. You can also get alerts about threshold breaches of a budget by:
- Setting the budget amount in dollars.
- Setting the budget value in percentage to track the rise or drop in percent.
To configure a budget for a BU, you need to:
- Choose Budget from the left navigation pane, and click Configure Budget in the top-right corner.
- Type the Display Name for the new budget.
- Choose Add for the Budget Policy if you're creating a budget for the first time. Budget policies are reusable across multiple budgets.
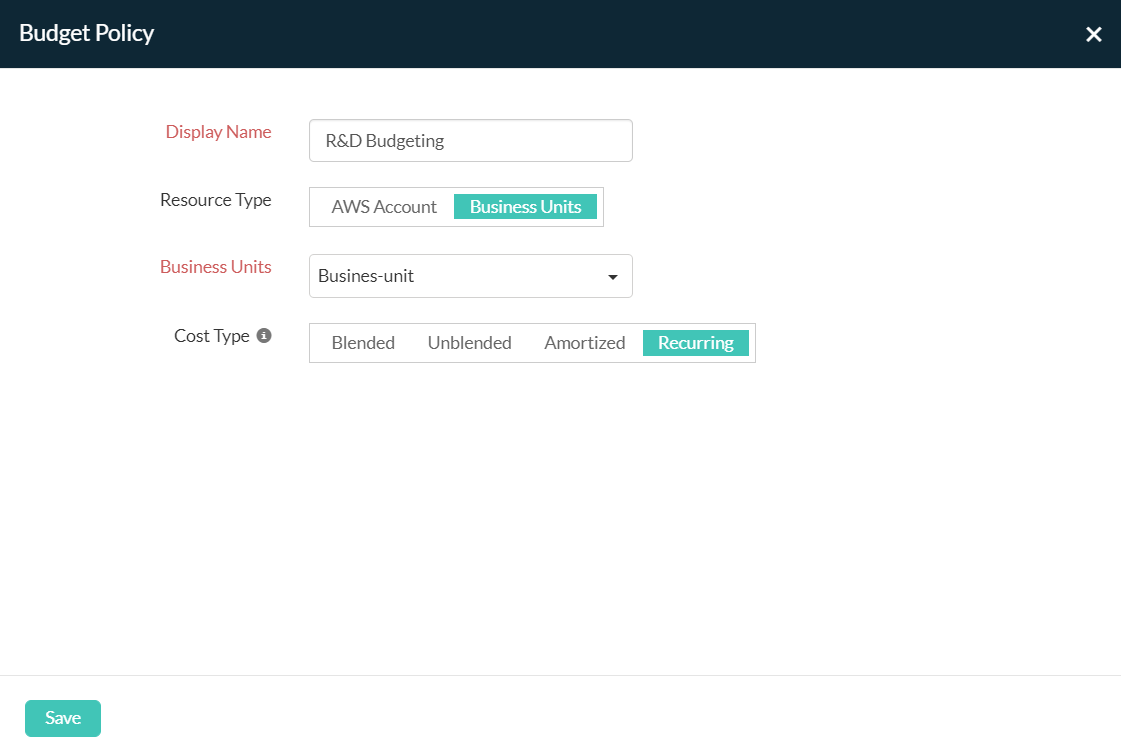
Fig. 4: Budget policy associated with a BU
- Type a display name for the new budget policy in the Budget Policy dialog box, and select the Resource Type as Business Units. Choose the BU from the drop-down to which the budget will be associated. The Cost type lets you select different cost types for your budget policy: Blended, Unblended, Amortized, Recurring. Click Save.
- Select the Period from the drop-down to set the duration for your budget.
- Select the measurement in the Unit field to configure the budget for your cloud costs. You can select either Amount (in dollars) or Percentage (with an option to select the rise or drop percentage).
- Enter the Budget Value either in Amount or Percent, according to the Unit chosen. Your actual spend will be evaluated against this value once every day, and an alert will be triggered if actual spending exceeds the budget value.
- Finally, select the email ID from the Send Email To drop-down to receive budget alert notifications.
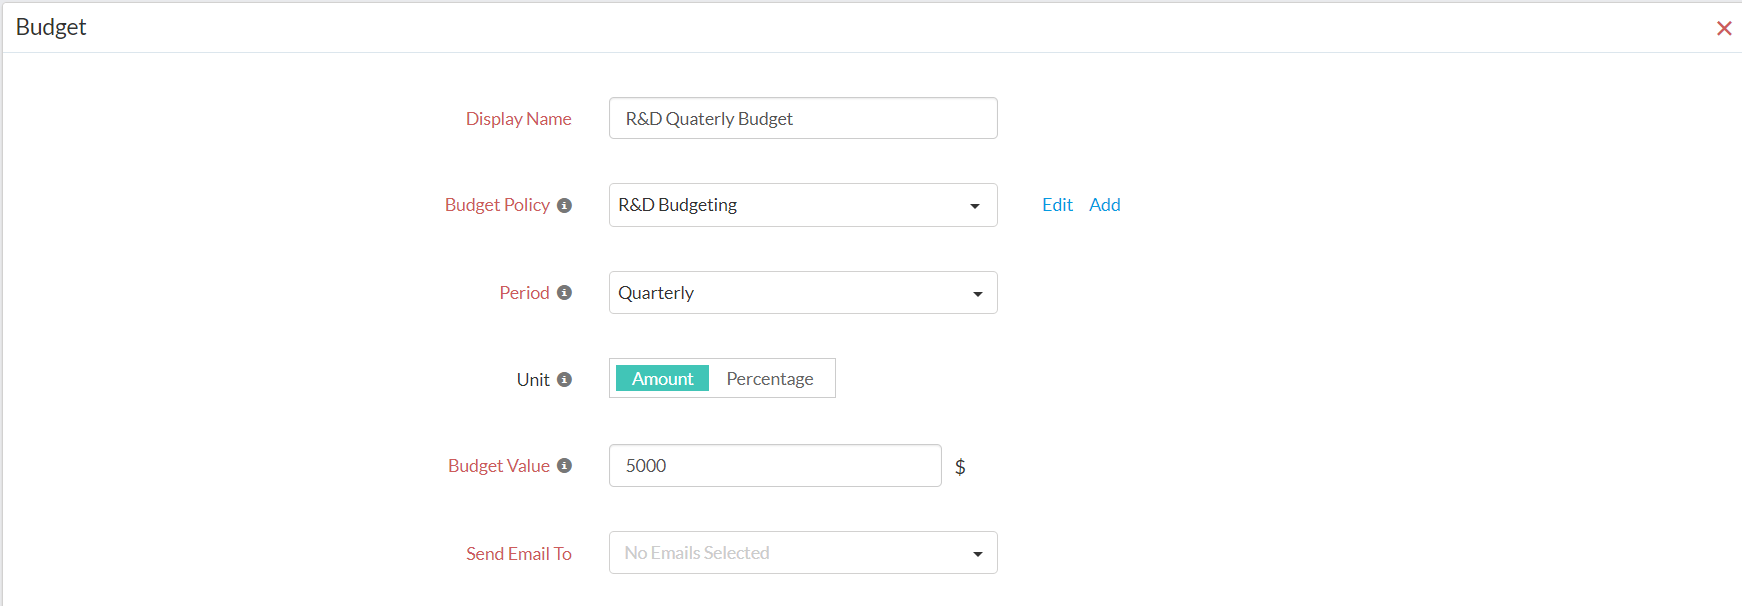
Fig. 5: R&D quarterly budget allocation
Forecasting
For business units (BU), allocating costs to individual departments equally and sticking to the monthly budget can be a cumbersome process. However, responsibility accounting or chargebacks can help administrators in finding out the departments that cross the budget or help them track factors that ballooned the expense and play a pivotal role in the implementation of tools like budgeting and forecasting. When budgeting is all about a business unit's targets or expected expenses, forecasting is a reality check that analyzes the historical data and provides an idea whether the expenses will meet the budget goals or exceed it. Forecasting thereby provides administrators an opportunity to rightsize resources or make changes in the plan accordingly.
With Forecast for BUs you can obtain an estimated total bill amount for your chargeback entities for the current or ongoing month based on your past usage. It can help you in assessing the split-up expenditure for individual business units, plan accordingly, and take measures not to exceed the monthly budget.
Cost Reporting
Billing reports provide cloud cost visibility into the current cost trends of your BU, and slice-and-dice reporting facilitates effective tracking of cost. With cost reporting, you can schedule reports monthly, quarterly, or yearly, to each BU. This way, you can schedule usage reports for BUs as often as you want.
Types of reporting for a BU
(i) Business Units List: The BU dashboard
As shown in Fig. 1, you can easily schedule reports for multiple BUs from the BU dashboard. The default frequency for such reports is monthly. Once you configure the BU lists reports, a pop-up screen (shown in Fig. 6 below) appears. BU lists facilitates selecting one or more BU for whom the report is scheduled monthly.
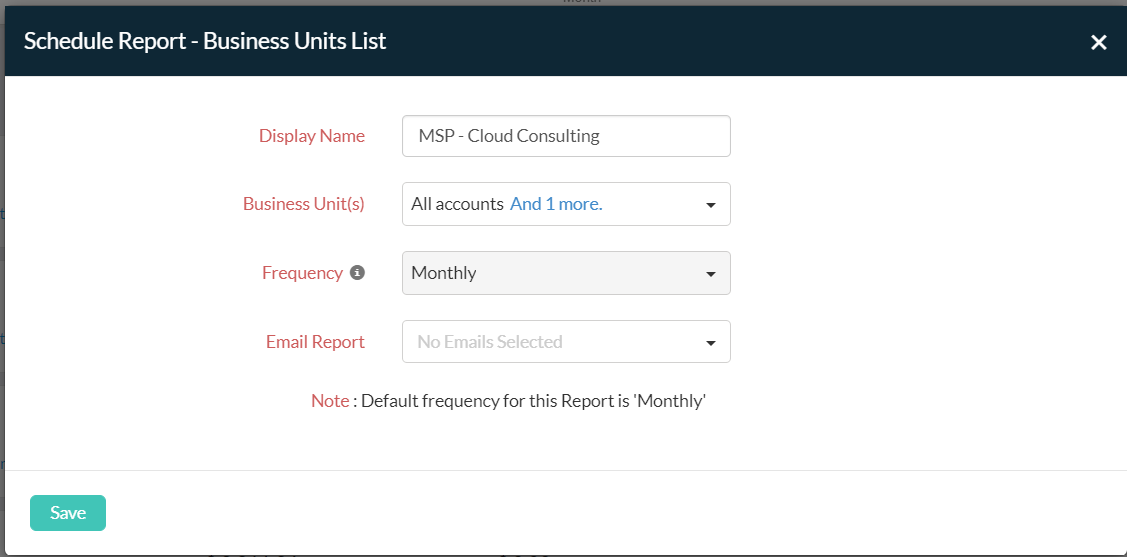
Fig. 6: Schedule reports for a BU list
(ii) Reporting from Spend Analysis for BUs
Within a BU, you can select specific accounts for which the spend analysis section will be loaded with data, and the report can be shared immediately using the Share option.
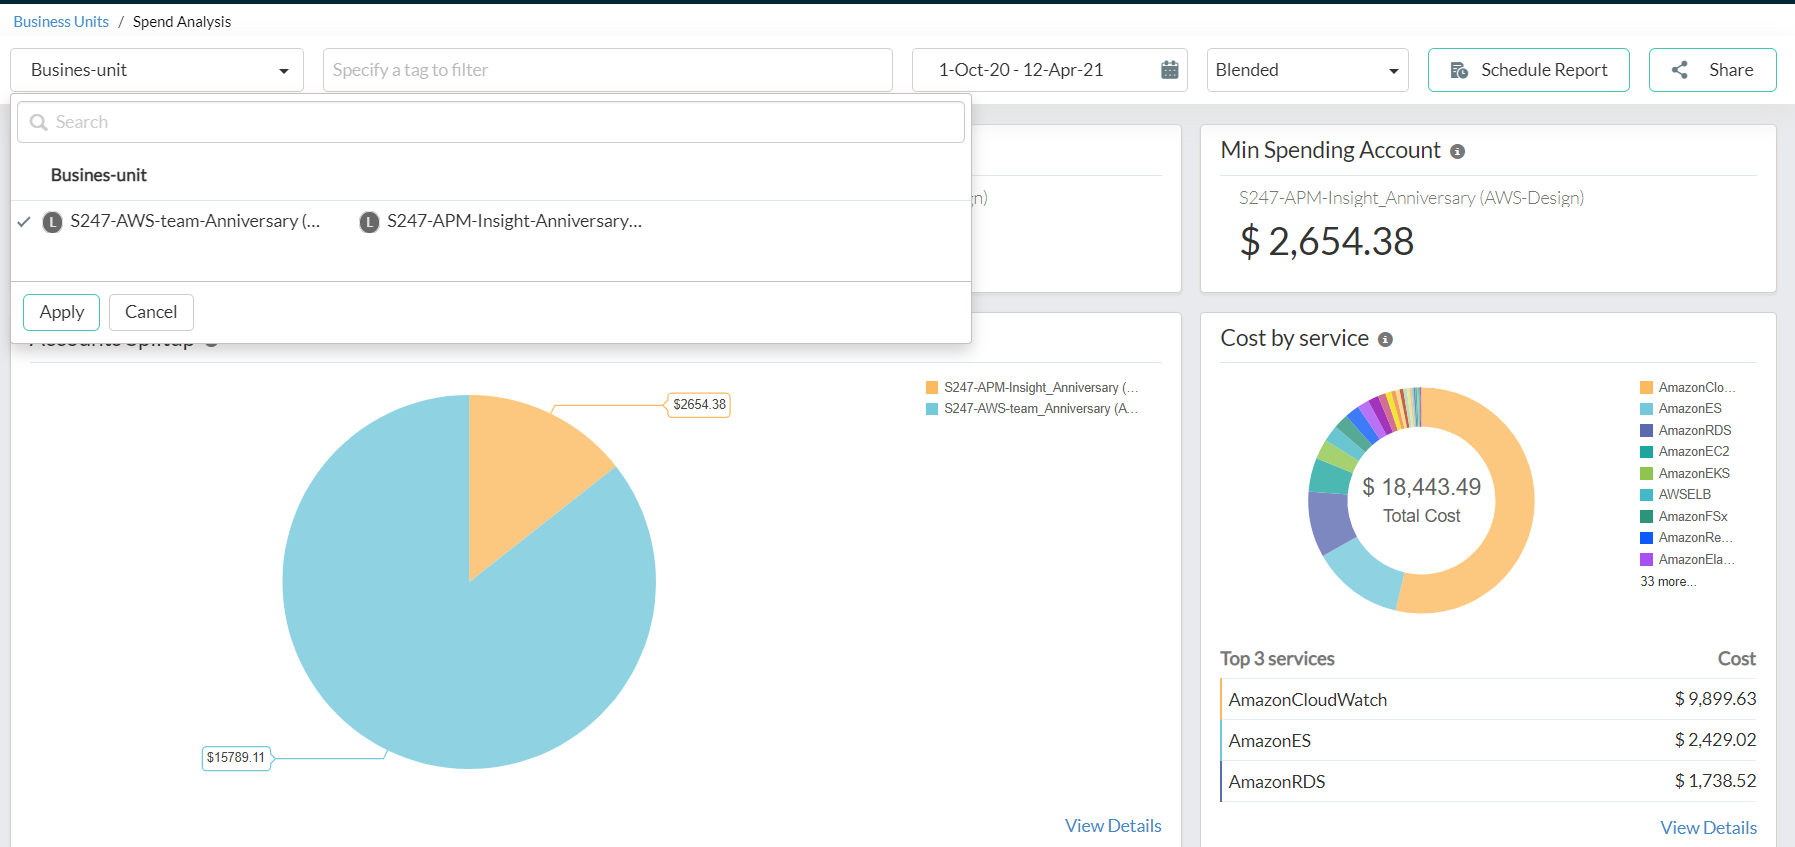
Fig. 7: Select specific accounts from BU Spend Analysis to share reports
On clicking Schedule Report, you can schedule the Spend Analysis reports for your entire BU in a monthly, quarterly, or yearly frequency to the email ID you specify.

Fig. 8: Schedule reports for BU Spend Analysis
(iii) Reporting from Resource Explorer for BUs
For a BU, you can pick specific accounts for which the Resource Explorer section will be loaded with data, and the report can be shared immediately using the Share option.
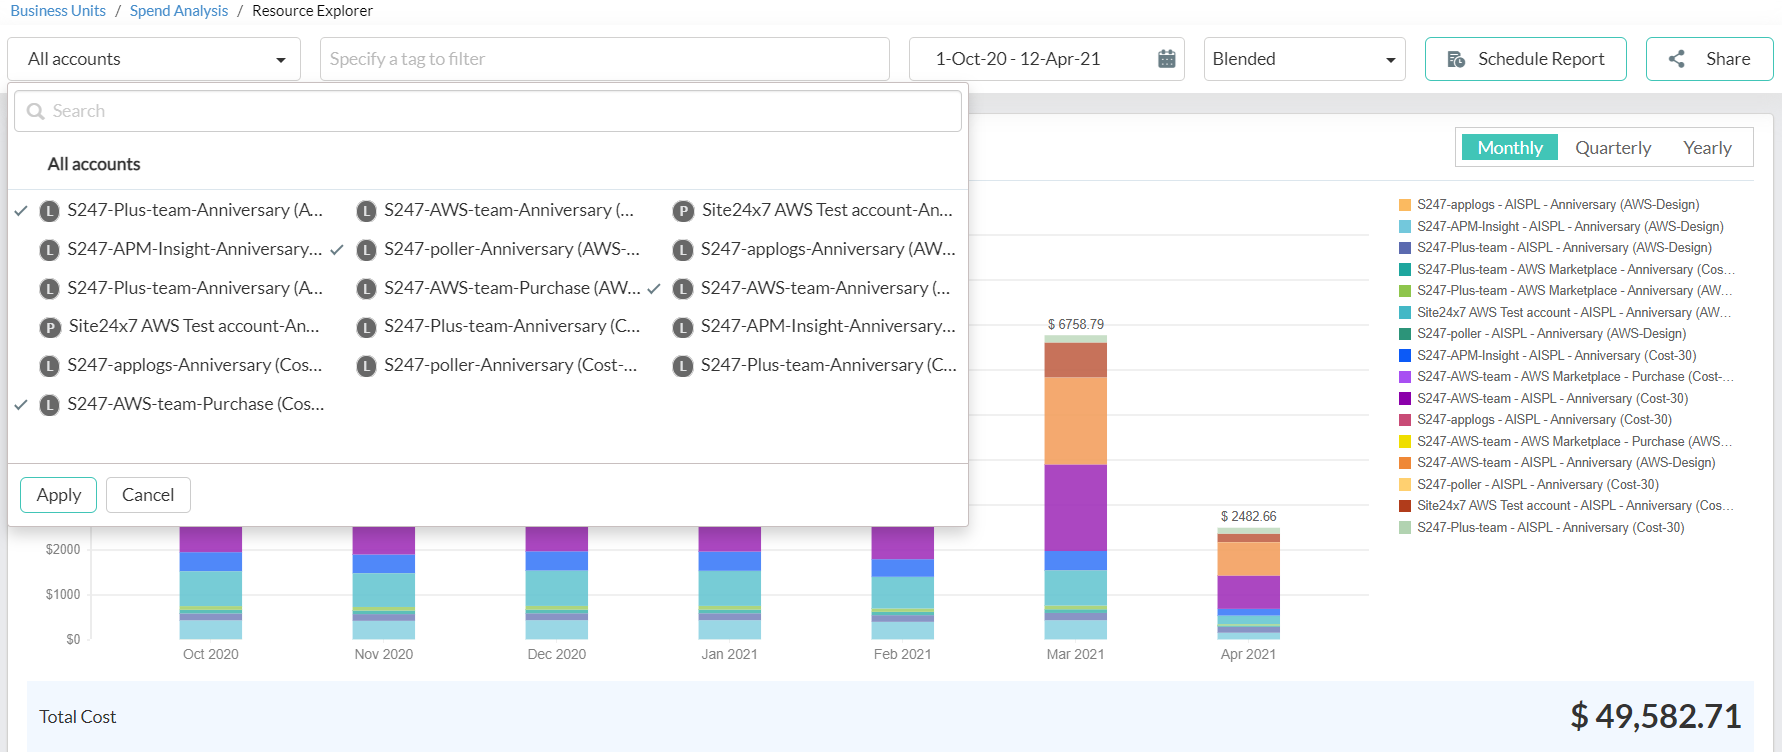
Fig. 9: Select specific accounts in a BU Resource Explorer to share reports
The Schedule Report feature in this section lets you generate this report based on grouping criteria like Region, Service, and Accounts on a monthly, quarterly, or yearly basis.
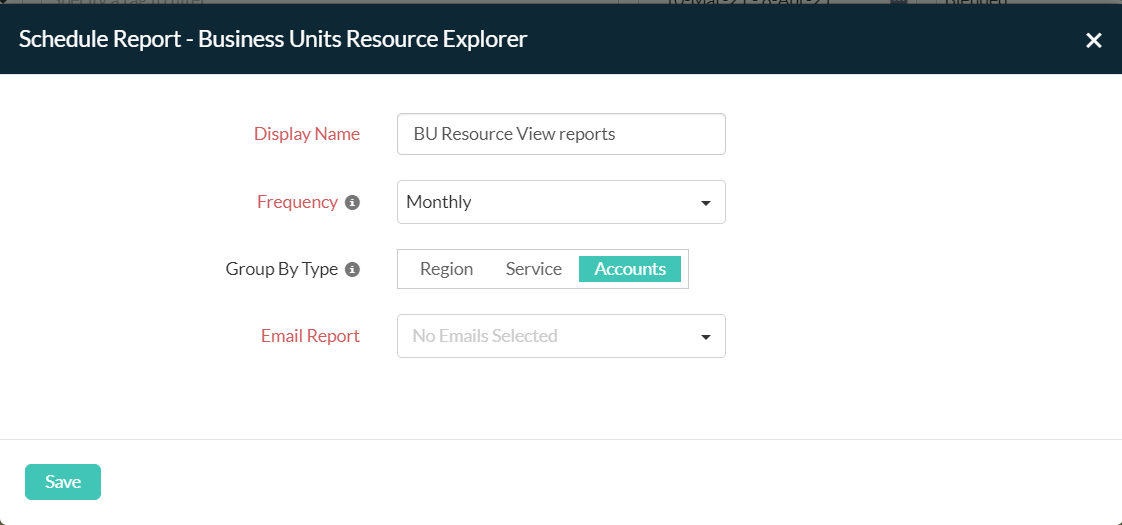
Fig. 10: Schedule reports for a BU Resource Explorer
(iv) Schedule Reports from the Admin tab
The Schedule Reports feature in the Admin section provides you with an overview of all the reports that have been scheduled till now. You can schedule reports for a BU from the Admin section on a yearly, quarterly, or monthly basis. If you have already scheduled a report for BU lists, BU Spend Analysis, or BU Resource Explorer, but would like to schedule it immediately, you can select Schedule Now in the hamburger icon.

Fig. 11: Schedule reports for BU Spend Analysis
Prerequisites
- You'll need at least one cost account.
- You need to have a CloudSpend role of Cost Administrator in your subscription account to configure a BU. Learn more.
- For tags to appear, you must activate both types of cost allocation tags (AWS-generated tags and user-defined tags) separately in the Billing and Cost Management console.
Various tagging strategies are available for a BU, like built-in tags, tags at the resource-level, and tag profiles; they facilitate grouping of identical cloud costs. Check out the following section to understand each one of them.
Tagging
Tags help you group and organize cloud costs that are similar. Here are two types of tags available for cloud cost analysis.
(i) Built-in tags
Built-in tags or auto-generated tags are the specific entities in your AWS bills that have been parsed and provided as tags for your convenience to organize costs. These consist of cost allocation tags like user-defined tags and AWS-generated tags configured in the AWS management console. The user-defined tags configured in the AWS management console, like group_site24x7 and monitor_site24x7, appear here.
Consider a scenario where you want to view the cloud's data-egress cost of your data science team. First, pick your data science team's account, choose the built-in tag (data transfer type) and select the type of cost to view. Some of the built-in tags with data-egress cloud costs are AWS Outbound, CloudFront Outbound, InterRegion Outbound, or IntraRegion Outbound. In Fig. 12 below, the suggested drop-down of tags is individual line items based on your AWS bill.

Fig. 12: BU Spend Analysis with built-in tag suggestions
Grouping tags at the Resource Explorer level
The tags at the Resource Explorer level of a BU facilitates viewing the spending pattern of resources. The built-in tags are displayed across the Resource Explorer section of a BU to help obtain a drilled-down view into the cost accrued for each AWS resource.
Consider a scenario where you need to view the costs accrued for resources in the US eastern region and the data transfer type of IntraRegion. You need to pick the tags associated with the availability zone and the data transfer type from the drop-down and view the resource-level costs. The paginated view of resources enables you to search for the cost associated with an individual resource in your AWS bill.

Fig. 13: BU Resource Explorer with built-in tags to view resource consumption
(ii) Tag profiles
Tag profiles facilitate customizing the tags by adding a key and value. Each key must be unique and each tag key can have only one value. Tag profiles facilitate combining two or more tags using AND, OR, or a combination of logical operators to create a tag value.
Consider a scenario where you need to track the cloud costs of an application running in three different environments, like Dev, Test, and Stage. Each environment represents a BU. To identify the cost accrued for EC2 instances utilized in the Dev environment and running in the US-east-1 region, you can easily create a tag profile using the AND logical operator. These tags can be used in the Spend Analysis and Resource Explorer section of each BU to obtain costs.
Configure a BU
While you configure a BU, you can associate multiple accounts from the same team or cross-accounts with a BU. Utilize tags to group and analyze your cloud cost further. To configure a BU, you need to:
- Log in to your CloudSpend account.
- Choose Business Units in the left navigation pane.
- Click Configure Business Units, in the top-right corner, opening the Business Units tab.
- Provide a Display Name, and select the different Accounts that you wish to group as a BU. You can see a combined view of all the linked accounts associated with your organization in Accounts. If you haven't enabled consolidated billing, only a single account will be listed.
- The Tags field allows you to group the BU according to various categories like Region, Operation Type, Data Transfer Type, Usage Type, Usage Info, Availability Zone, or other custom tags using Tag Profiles. You simply need to type into the Tags field for the suggestions to appear.
- Click Save.
Edit/Delete a BU
You can modify or delete the BU that you created by following these steps:
- Go to the CloudSpend console.
- Choose Business Units from the left navigation pane.
- Click on the hamburger icon against each BU on the right side.
- Choose Edit or Delete from the menu drop-down list to modify or delete the existing BU.
- If selecting Edit, in the following dialog box, make the necessary modifications for the BU, and choose Save.