Integrate Amazon Web Services Account with CloudSpend
This doc provides an overview on:
- Connecting an AWS account with CloudSpend
- Connecting a Site24x7 account with CloudSpend
- Connecting a MSP account with CloudSpend
- Support for linked accounts
- Configuration Errors in Accounts
Connecting an AWS account with CloudSpend
Integrating your Amazon Web Services(AWS) account is a three-stage process:
Stage 1
Provide CloudSpend programmatic read-only access to specific AWS services including—Amazon S3, Cost and Usage report, IAM and Organizations.
Stage 2
- Create a new Amazon S3 bucket, assign an access policy that allows Billing and cost management to save the Cost and Usage report to the said bucket. (If you're already depositing billing reports to an S3 bucket skip to stage 3).
- Create an AWS Cost and Usage report and deliver the report to the created Amazon S3 bucket.
Stage 3
Sign in to the CloudSpend console and configure the Integrate AWS Account page.
Enable programmatic access (Stage 1)
You can provide CloudSpend programmatic access to your AWS resources using two ways. You can create a cross-account IAM Role and establish a trust relationship between your AWS account and CloudSpend's AWS account.
Between the two, IAM Role is recommended as there is no sharing of security credentials. Also when you delegate permissions using Roles, you can designate the AWS accounts that are allowed to assume the role, thereby safeguarding your account from unauthorized access.
IAM role based access
The following section will walk you through the IAM Role creation process:
Get your External ID
Open the CloudSpend web console and sign in.
When you open the CloudSpend console for the first time, you'll land on an on-boarding carousel highlighting the features of the app. You can read and understand how the app can help you, or you can choose to skip.
Click on Integrate AWS Account. In the Integrate AWS Account page, provide a Display Name, and choose IAM role as the Access Type. Copy the Account ID and External ID and save the value in a notepad for the AWS IAM Role creation step. Also, keep this browser tab open.

Create an IAM role
To create an IAM role follow the below mentioned steps:
Step 1: Select trusted entity
- Log in to the AWS Management Console and open the AWS IAM console.

- Select Access Management > Roles from the left navigation pane.

- Click Create Role.
- Select AWS Account from the Trusted entity type options.
- Select Another AWS Account option.
- Enter Site24x7's AWS account ID in the Account ID field displayed in the Integrate AWS Account page.
- Check the Require external ID box.Note: Ensure that the box next to Require MFA is unchecked.

- Enter the unique External ID displayed in the Integrate AWS Account page.
- Click Next.
Step 2: Add permissions
Site24x7 requires ReadOnly access to your AWS services and resources. You can either attach an existing AWS managed policy or create your own policy.
- In the Add permissions page, search for and select ReadOnlyAccess which is the AWS managed policy.
If you wish to monitor the usage metrics of your Kinesis Video Streams, ensure that you also select AmazonKinesisVideoStreamsReadOnlyAccess. - Click Next.
You can also create and attach a custom policy to the cross-account IAM role. To do so, follow the steps mentioned below:
- Navigate back to the AWS IAM console.
- Select Access Management > Policies from the left navigation pane.
- Click Create Policy.
- Choose the JSON tab and delete the existing JSON policy snippet.
- Copy and paste the JSON policy shown below in the JSON tab.
{
   "Version":"2012-10-17",
   "Statement":[
      {
         "Sid":"VisualEditor0",
         "Effect":"Allow",
         "Action":[
            "organizations:ListRoots",
            "s3:GetObjectVersionTagging",
            "organizations:DescribeAccount",
            "organizations:ListChildren",
            "s3:GetObjectAcl",
            "organizations:DescribeOrganization",
            "s3:GetObjectVersionAcl",
            "organizations:DescribeHandshake",
            "s3:GetBucketWebsite",
            "s3:GetBucketNotification",
            "s3:GetReplicationConfiguration",
            "s3:ListMultipartUploadParts",
            "organizations:ListAccountsForParent",
            "organizations:ListHandshakesForAccount",
            "s3:GetObject",
            "iam:GetUserPolicy",
            "s3:GetAnalyticsConfiguration",
            "organizations:ListOrganizationalUnitsForParent",
            "s3:GetObjectVersionForReplication",
            "cur:DescribeReportDefinitions",
            "s3:GetLifecycleConfiguration",
            "s3:GetBucketTagging",
            "s3:GetInventoryConfiguration",
            "s3:ListBucketVersions",
            "s3:GetBucketLogging",
            "s3:ListBucket",
            "s3:GetAccelerateConfiguration",
            "s3:GetBucketPolicy",
            "organizations:DescribePolicy",
            "s3:GetObjectVersionTorrent",
            "s3:GetEncryptionConfiguration",
            "organizations:ListCreateAccountStatus",
            "s3:GetBucketRequestPayment",
            "organizations:DescribeOrganizationalUnit",
            "s3:GetObjectTagging",
            "s3:GetMetricsConfiguration",
            "organizations:DescribeCreateAccountStatus",
            "organizations:ListPoliciesForTarget",
            "s3:ListBucketMultipartUploads",
            "organizations:ListTargetsForPolicy",
            "s3:GetBucketVersioning",
            "organizations:ListAWSServiceAccessForOrganization",
            "s3:GetBucketAcl",
            "organizations:ListPolicies",
            "organizations:ListHandshakesForOrganization",
            "organizations:ListAccounts",
            "s3:GetObjectTorrent",
            "s3:ListAllMyBuckets",
            "s3:GetBucketCORS",
            "organizations:ListParents",
            "iam:GetUser",
            "s3:GetBucketLocation",
            "s3:GetObjectVersion"
         ],
         "Resource":"*"
      }
   ]
}
- Click Next: Tags. (Click Add Tags and enter the Key and Value, if you wish to add tags.)
- Click Next: Review.
- In the Review policy page, enter the Name and Description.
- Click Create policy.
- Follow the steps mentioned in the Step 1: Select trusted entities and Step 2: Add permissions sections above for creating a cross-account IAM role. Search for and select the policy that you created and click Next.
Step 3: Name, review, and create
- Enter the Role name and Description.
- Review the details configured in Step 1: Select trusted entity and Step 2: Add permissions.
- Click Create Role. Once done, an ARN role will be created for the IAM role you created.
Copy Role ARN
- Go to IAM > Roles page.
- Click the refresh button.
- Search the role name that you created and click the role name hyperlink.
- Copy the ARN details from the Summary section and paste it in the CloudSpend>Integrate Account> Role ARN field.
IAM User based access (deprecated)
The following section will walk you through the AWS IAM user creation process:
Select Access Type
- Sign in to the AWS Management Console and open the IAM console.
- In the navigation pane, click on Users and then click on Add user.
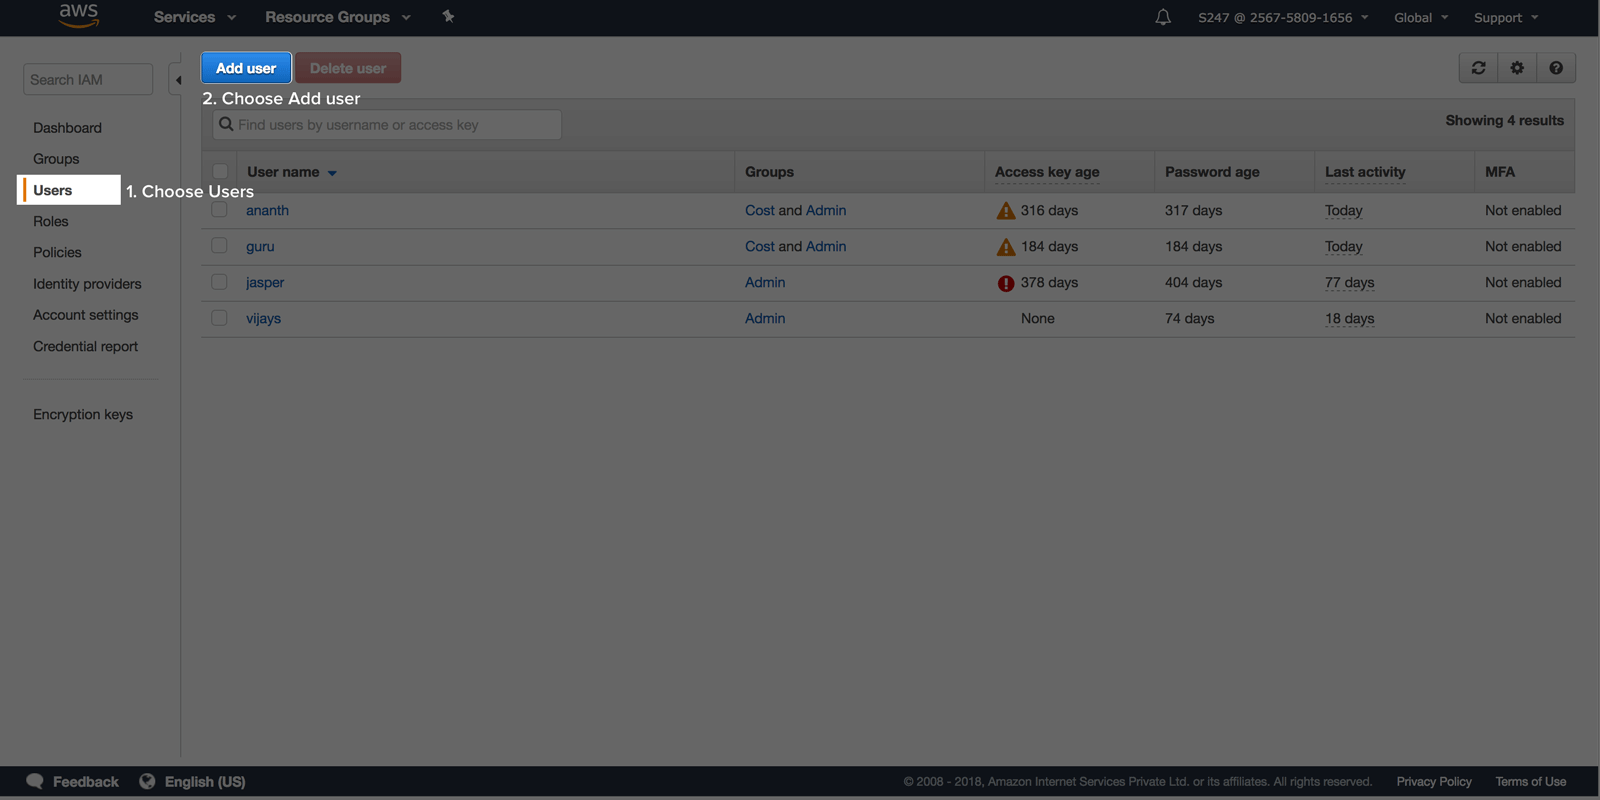
- For user name, type a meaningful name.
- Select Programmatic access as the type of access.
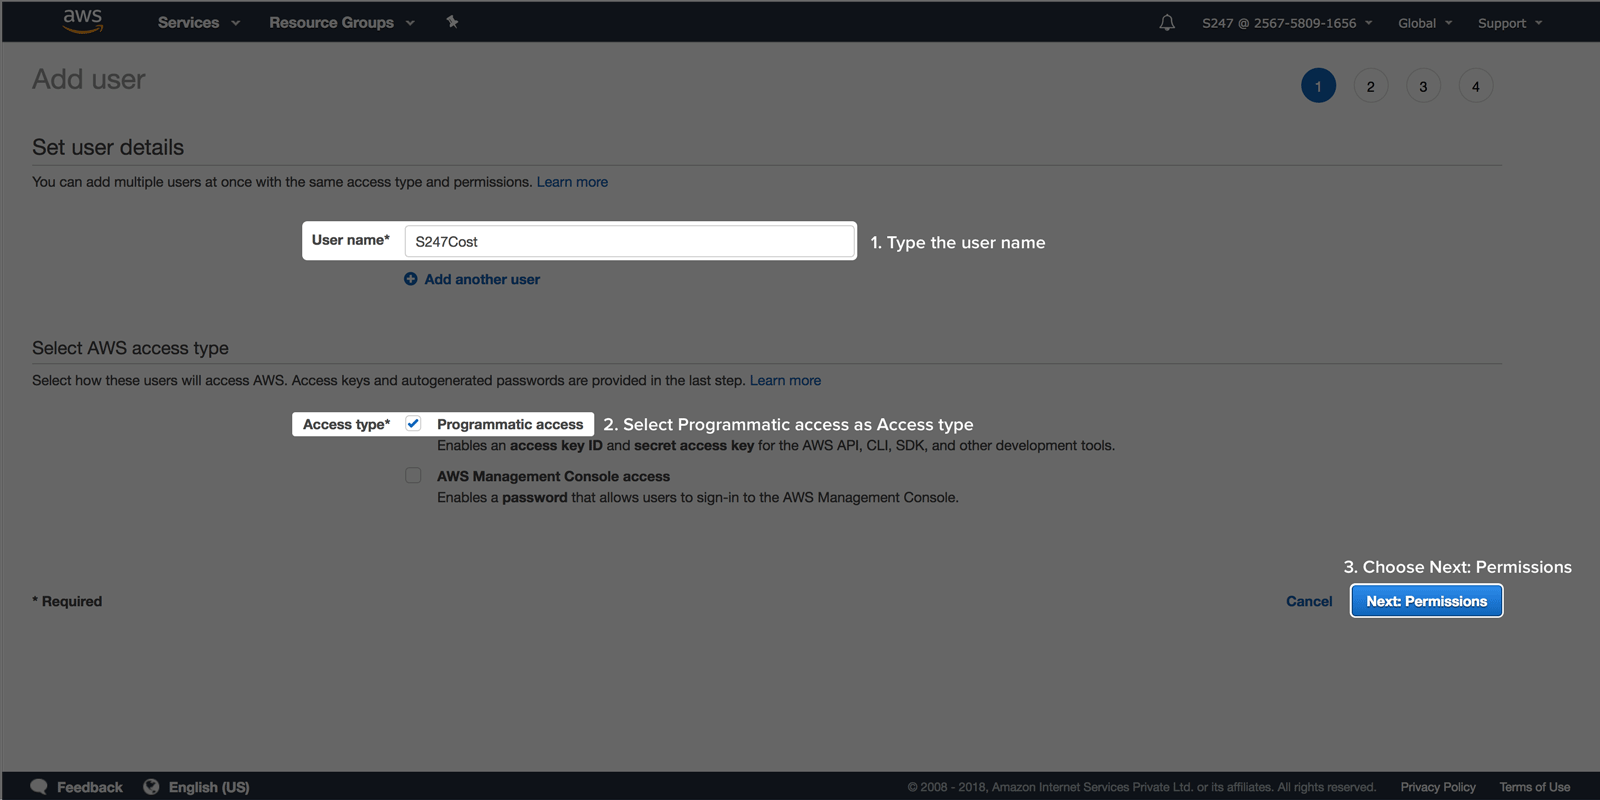
- click on Next: Permissions.
Assign permissions
- In the Set permissions window, choose the option Attach existing policies to user directly and click on the Create policy button to open a new browser tab.
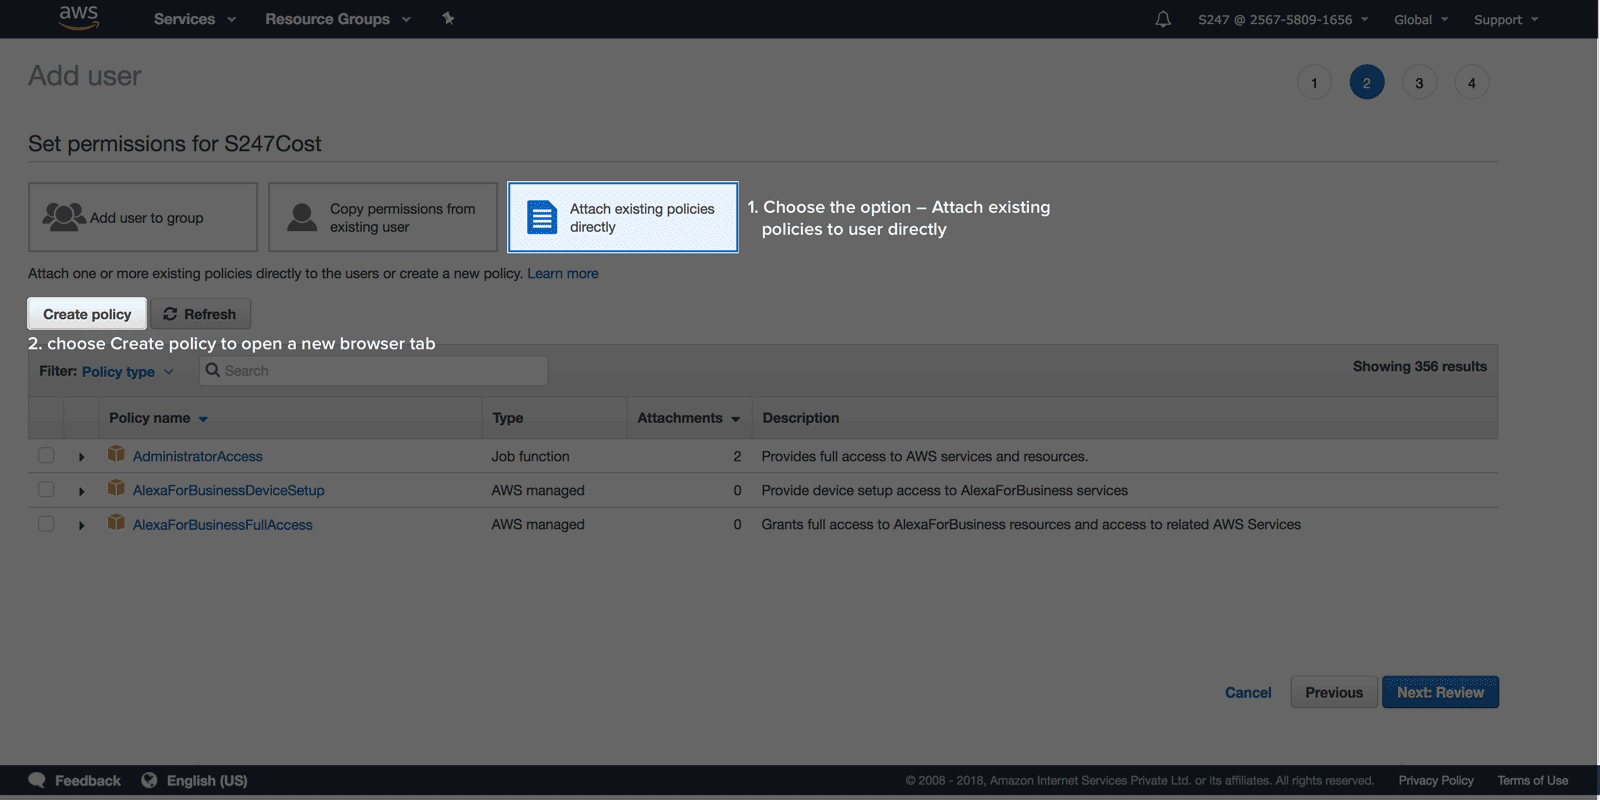
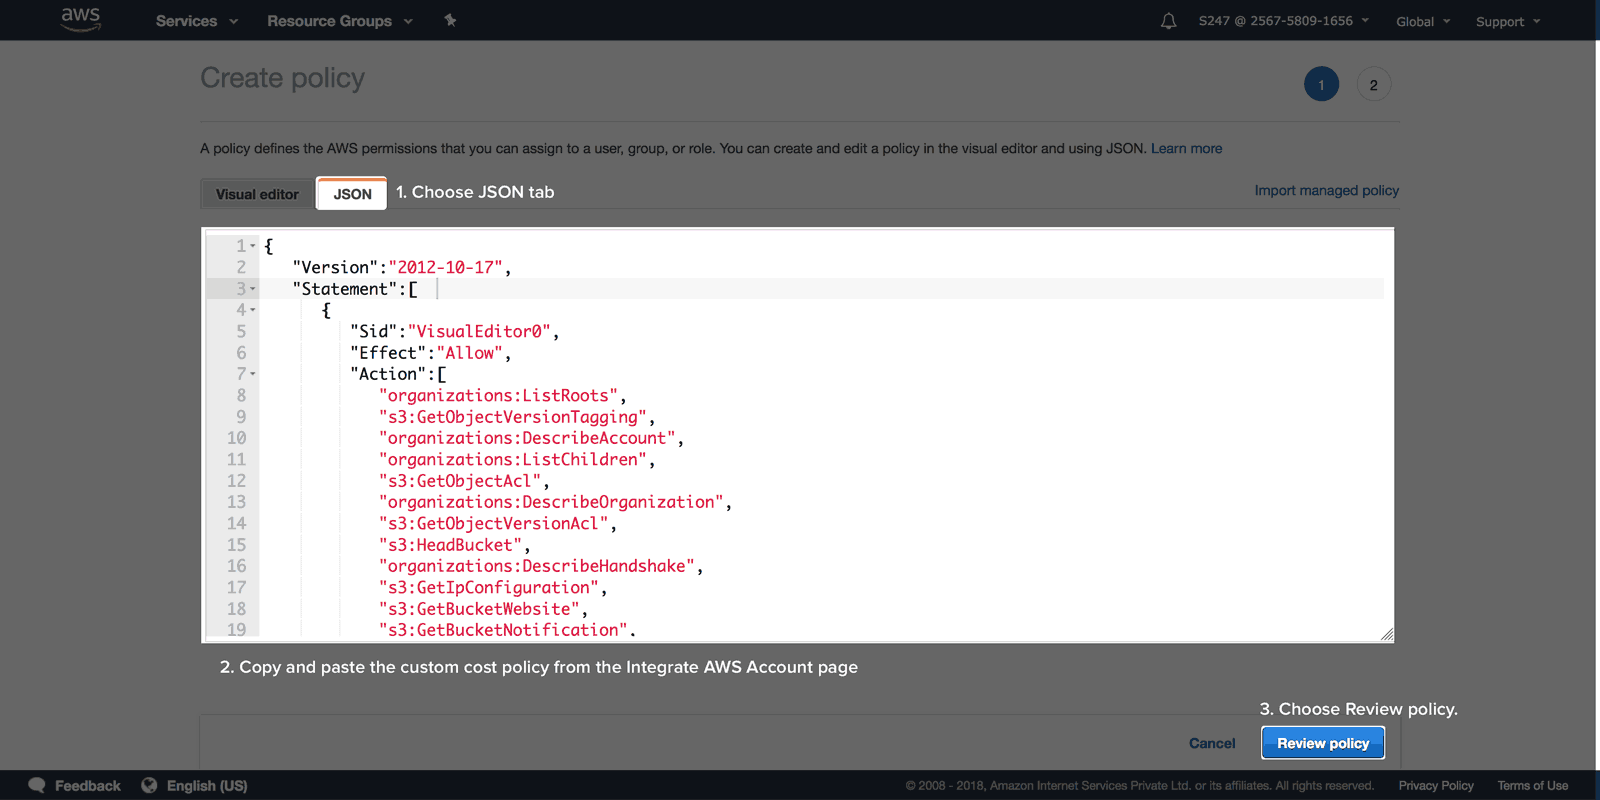
- Choose the JSON tab. Copy the custom policy shown below and paste it in the editor.
{
   "Version":"2012-10-17",
   "Statement":[
      {
         "Sid":"VisualEditor0",
         "Effect":"Allow",
         "Action":[
            "organizations:ListRoots",
            "s3:GetObjectVersionTagging",
            "organizations:DescribeAccount",
            "organizations:ListChildren",
            "s3:GetObjectAcl",
            "organizations:DescribeOrganization",
            "s3:GetObjectVersionAcl",
            "organizations:DescribeHandshake",
            "s3:GetBucketWebsite",
            "s3:GetBucketNotification",
            "s3:GetReplicationConfiguration",
            "s3:ListMultipartUploadParts",
            "organizations:ListAccountsForParent",
            "organizations:ListHandshakesForAccount",
            "s3:GetObject",
            "iam:GetUserPolicy",
            "s3:GetAnalyticsConfiguration",
            "organizations:ListOrganizationalUnitsForParent",
            "s3:GetObjectVersionForReplication",
            "cur:DescribeReportDefinitions",
            "s3:GetLifecycleConfiguration",
            "s3:GetBucketTagging",
            "s3:GetInventoryConfiguration",
            "s3:ListBucketVersions",
            "s3:GetBucketLogging",
            "s3:ListBucket",
            "s3:GetAccelerateConfiguration",
            "s3:GetBucketPolicy",
            "organizations:DescribePolicy",
            "s3:GetObjectVersionTorrent",
            "s3:GetEncryptionConfiguration",
            "organizations:ListCreateAccountStatus",
            "s3:GetBucketRequestPayment",
            "organizations:DescribeOrganizationalUnit",
            "s3:GetObjectTagging",
            "s3:GetMetricsConfiguration",
            "organizations:DescribeCreateAccountStatus",
            "organizations:ListPoliciesForTarget",
            "s3:ListBucketMultipartUploads",
            "organizations:ListTargetsForPolicy",
            "s3:GetBucketVersioning",
            "organizations:ListAWSServiceAccessForOrganization",
            "s3:GetBucketAcl",
            "organizations:ListPolicies",
            "organizations:ListHandshakesForOrganization",
            "organizations:ListAccounts",
            "s3:GetObjectTorrent",
            "s3:ListAllMyBuckets",
            "s3:GetBucketCORS",
            "organizations:ListParents",
            "iam:GetUser",
            "s3:GetBucketLocation",
            "s3:GetObjectVersion"
         ],
         "Resource":"*"
      }
   ]
}
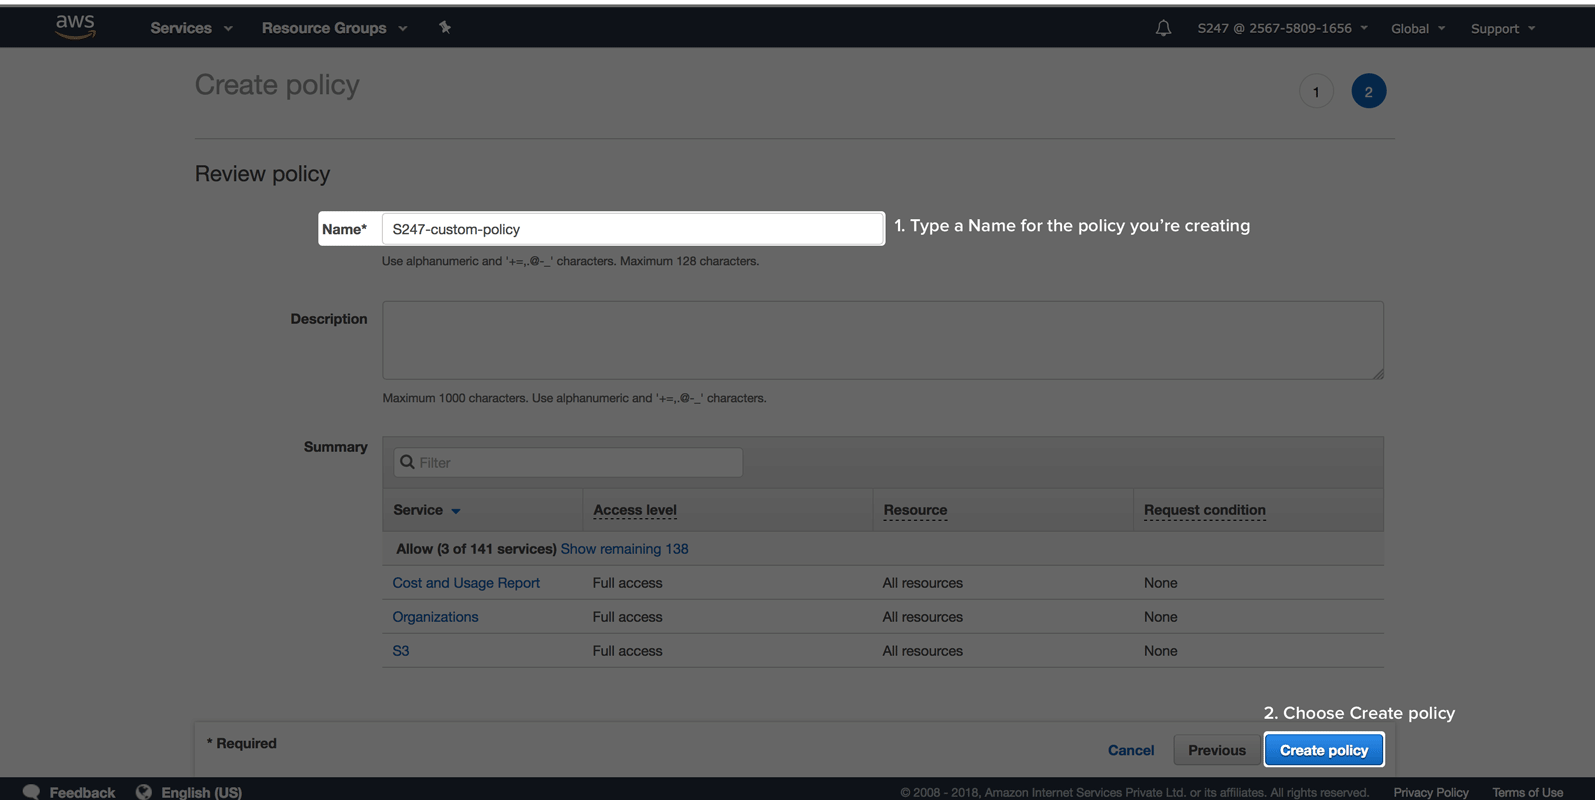
- Click on Review policy.
- On the review page, type a name and a description for the policy you're creating. Evaluate the permissions granted, if everything looks satisfying click on Create policy.
- Back in the Set permissions page, select Refresh, type the name of the policy you just created in the search box to filter the list.
- Select the check box next to the name of the policy. Click on Next: Review

Download credentials
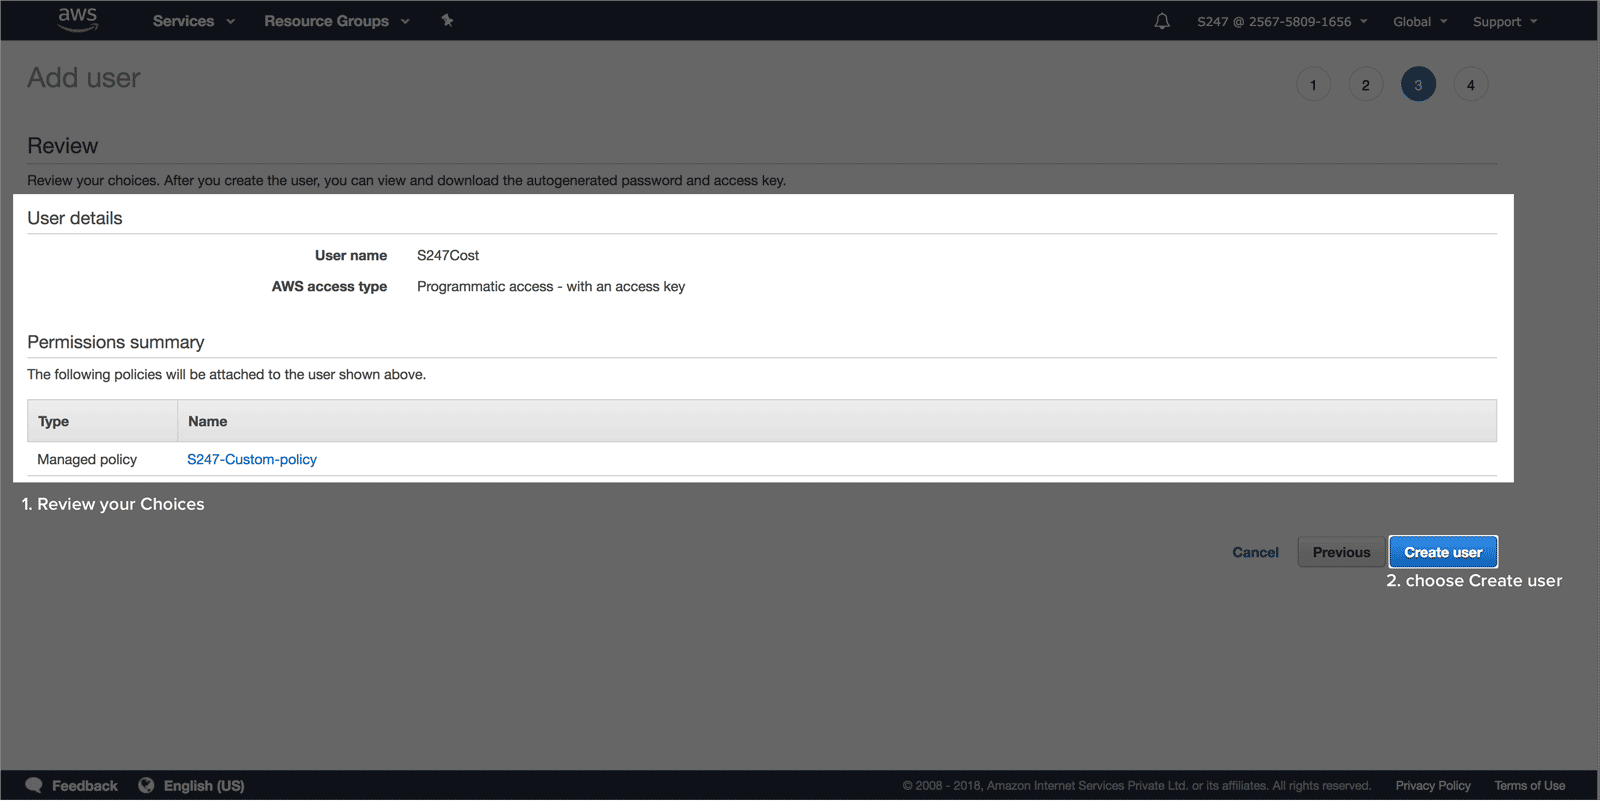
- Review user details and permissions. If everything is in order click on Create user.
- Choose Download.csv and save the file in a secure location. (This is the only opportunity you will get to view or save the security credentials.)
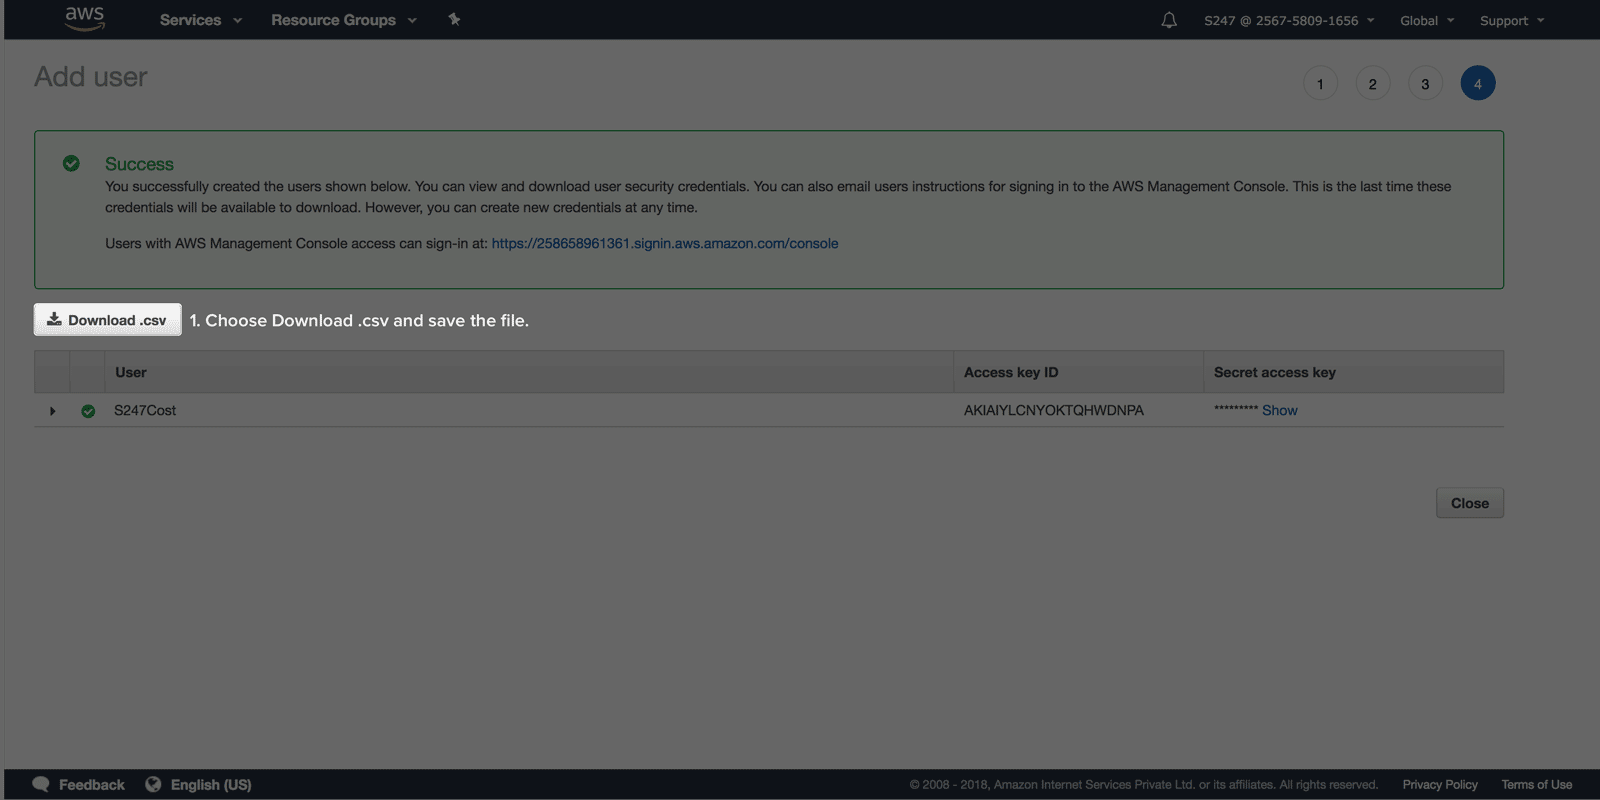
- Open the file, copy the secret access key and access key ID and save it to a notepad for stage 3.
Turn on billing reports (Stage 2)
The AWS Cost and Usage report tracks your monthly AWS usage (services configured) and provides estimated charges based on various dimensions like amount of time, data transfer, type, region etc. If you're using the consolidated billing feature in AWS Organizations, then this report will only be available to the master account and will include all the activity of the member accounts associated with the organization.
AWS delivers the report CSV files to an Amazon S3 bucket. To deliver billing files to an existing or new S3 bucket follow the below mentioned steps. If you're already publishing the report to a bucket, then please skip to stage 3.
Create an AWS Cost and Usage Report
To create an AWS cost and usage data to an S3 bucket, follow the below mentioned steps to get started.
Step 1 - Specify report details
- Sign into the organization's master AWS account.
- Select Billing Dashboard.

- Select Cost & usage reports in the left navigation pane and click Create Report.

- In the Specify report details page, enter the Report name.
- Check the Include resource IDs box in the Report content section and keep the Data refresh settings at default.
- Click Next.
Step 2 - Set delivery options
- To configure S3 Bucket, click Configure.

- Select the existing bucket option and click Browse S3.
- Enter the required S3 Bucket name and select the required S3 Bucket from the S3 Bucket Selector page.
- Click Save.
- Check The following default policy will be applied to your bucket box and click Save.
- Enter the S3 path prefix and set the Report data time granularity as Hourly.

- Select Overwrite existing report as Report versioning.
- Keep Compression type at default and click Next.
Step 3 - Review and create
- Review the report settings.
- Click Create Report.
Connect AWS account (stage 3)
Configure the Integrate AWS account page
- If you've created an IAM Role, navigate back to the open CloudSpend console browser tab (the same tab where you copied the External ID and Account ID)and paste the Role ARN in the appropriate field.
- If you've created an IAM user, sign in to the CloudSpend web console and click Integrate AWS Account. Type in a display name, and choose IAM user as the Access type. Copy and paste the Access key ID and Secret access key in the appropriate field.
- Type the name of the AWS Cost and Usage report you created in the Report field
- The bill processing starting date determines what line items get processed and what items get left out during bill parsing. Choose an appropriate starting date as per your requirement.
- Click Save.
Connecting a Site24x7 account with CloudSpend
Connect your Site24x7 account directly with CloudSpend by:
- Provide a Display Name, and choose your access type as Site24x7 Account in the Integrate Account page. In the drop-down below, pick the Site24x7 AWS account to be integrated.
- Create a new cost policy in the AWS management console.
- Whether your Site24x7 account has an IAM user or an IAM role, attach a cost policy by following the respective set of steps on the Integrate Account page.
- Follow the steps in Stage 2 and Stage 3 from connecting an AWS account to complete the process of integrating a Site24x7 account with CloudSpend
Connecting a MSP account with CloudSpend
Connect your Site24x7 MSP account directly with CloudSpend by:
- Provide a Display Name, and choose your access type as Site24x7 Account in the Integrate Account page.
- Choose the MSP customer from the drop-down, and in the next drop-down, pick the Site24x7 AWS account associated with the customer that needs to be integrated.
- Create a new cost policy in the AWS management console.
- Whether your Site24x7 account has an IAM user or an IAM role, attach a cost policy by following the respective set of steps on the Integrate Account page.
- Follow the steps in Stage 2 and Stage 3 from connecting an AWS account to complete the process of integrating a Site24x7 account with CloudSpend
Support for linked accounts
You can now leverage the cloud cost management tool for your linked accounts in AWS by choosing the Account Type as "Linked Account" in the Integrate account page. When you select a linked account, in addition to specifying the report name, specify the S3 bucket name and bucket prefix (if configured) to store the reports.
Configuration Error Accounts
You can now easily view the errors in configuring your CloudSpend account, like Invalid report name or Expired roles in the Configuration Error Account(s) section. Choose to either edit or delete the configuration error and rectify the errors for all accounts from a single view.
